So I just wrapped up a very big event at the organization I work at. I am excited to report that it went very well and many families had a great time. This year I had an idea to create a "face in the hole" for kids to pose behind. This is something that the organization can use for many years for this annual fall event.
What's a "face in the hole"? Here are some examples:
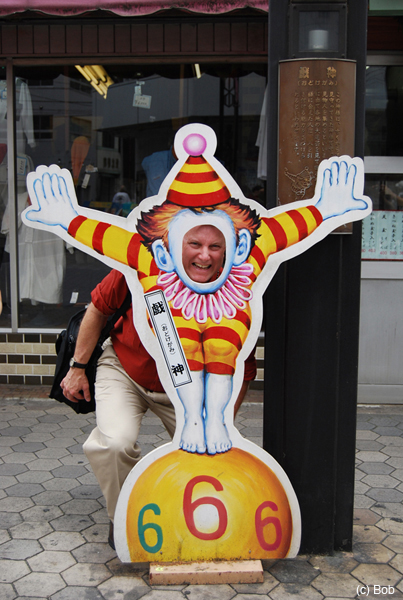
So I got to work sketching out a design. I decided to make one with two face cut outs so two children can stand behind it. I wanted to include elements of our location including our iconic barn and the name of the organization. I needed some help with the wood work so I had my dad donate his wonderful time and skills on this. First, we got a 4' X 4' piece of plywood. My dad primed it with leftover paint and I sketched out the design onto the wood. Then my dad went to work on cutting out the upper outline so it blends more into the background. He also cut out the holes for the faces.
How did I figure out the face hole sizes? We actually took an old Halloween mask and measured around it to figure out the hole sizes.
Make sure you sand the face cut outs really well so there are no splinters. My dad used a sander and then manually sanded the rest. After that I got to work on sketching and painting the design. My advice would be to make it more "cartoonish." It's a fun thing for families to pose behind so they want it to be a bit sillier. Here are the pictures of the progress as I painted. I used acrylic wood paint and then sprayed it with an indoor/ outdoor finish to seal and protect it.
After it was all completed, we attached it to a stand raising it about one foot. If anyone is interested in the design, let me know and I will get it from my dad but I know its pretty standard. Here are two of my coworkers posing behind it.
I am so happy with it. It will be a lot of fun for families to use when they visit our site.
Have you done any fun crafts lately? We carved our pumpkins this weekend for our annual carving party... but I will talk more about that this week.
Showing posts with label Getting crafty over here. Show all posts
October 21, 2012
October 1, 2012
Burlap and wedding bells
So we are going to pretend that August and September never happened. To be honest it was a very big blur. I can't even really remember where it went but now its the beginning of October and I have completely neglected this blog. We have been doing lots of things so I feel its time to step it up. Plus, we broke ground two weekends ago on our bump out project that we talked about earlier this year.
But I do want to talk about the project that we worked on for my brother in law's wedding. The dilemma: an outdated swan stain glass picture in the reception hall. My sister in law hated it. It taunted her and screamed traditional and old fashioned. So after some discussion we decided that a really cool burlap tapestry would be cool since they were going for an outdoor/ modern barn theme. I started thinking about what we could do and I figured I would create some stencils of something meaningful.
We laid out some burlap on our small kitchen table and got to work. Originally she wanted a poem on the burlap but with the small time before the wedding + my hectic job + my growing belly, I couldn't make it work. It happens. But I believe things like that always lead to something even more creative and fun. And I think in this case it did. We decided to go simple. We would do L & G. (The first letter of their names) It would be simple, not too distracting.
I found some great font using howaboutorange.blogspot.com. They have links for free fonts to download. Of course since this was in August, I don't have it anymore. I will keep digging. Anyways, I sketched it out on freezing paper and then I cut out the stencil with an exacto knife. I have to admit that while I was working on this I was plunged back into my college days in my dorm room at 1AM trying to finish a project for one of my art classes.
After they were all cut out, I laid them out on the burlap and ironed the freezing paper onto the burlap. This keeps the spray paint from spreading. I also ironed on the scraps around the letters to prevent the spray paint from going everywhere.
It was ready to go. I had to work late so my hubby jumped in and took the burlap outside and sprayed the stencil with trust ORB. It came out great.
Next up my mother in law, who has a great site called Tess' Totes, sewed canvas to the back of the burlap so it would be thick enough to hide the swan and to create a way to hang the piece using a dowel. Unfortunately we could not find a picture of it from the wedding so here is a shot of it in my MIL's craft room. It's a little wrinkled from the wedding but it came out great.
Here are some other highlights from the fun day. They had great weather, a great party and her bridesmaid dresses were uber flattering; especially for a preggo like me. :)
So what else have I missed? I will be back with some bump out updates, fresh homemade tomato sauce and other nursery projects.
March 26, 2012
Getting festive: Spring Mantle
Special Tuesday post! I was excited about my little project on Sunday and wanted to share. I am not much for decorating for every holiday. I prefer seasonal decoration except for Halloween or Christmas but I couldn't resist brightening up our mantle a little. A little disclaimer: we need to scrub the fireplace. It got a great workout this winter but I haven't gotten around to it.
The theme is spring but you will see Easter eggs in the vases. This decorating was all free since I just used what I had and what my mom gave me from her collection. But enough talk. Let's get some more sunshine in this blog.
I made this banner by printing out the free labels on BHG.com and spelling out Springtime!. I hung it up with yarn. A free and simple banner.
It was simple to grab things around the house to tie it all in. The wrapped wine bottles, you may remember are from an earlier project. I grabbed books with light, spring colors and various vases for the decorative wooden eggs that my mom gave me.
Here is the other angle.
For fun I added some really colorful easter baskets for a punch of strong color.
Thats all I got. Short and Sweet. Did you decorate for spring? Send me a picture. Anyone else love spring as much as me? :)
Labels:
Getting crafty over here,
Holiday Fun
March 14, 2012
Restoring Order to a SMALL Linen Closet
As most of you know I am working on our upstairs bathroom (if you don't check it out here and here). Before I write about the last steps of the shower redo I had to accept a challenge. You see while I was reviewing my New Years Resolutions on Monday, I realized that I have not done any work on organizing our house. Zip. Nada. Then it hit me...accept the Pinterest Challenge!

Katie from the Bower Power and Sherry from Young House Love started doing the pinterest challenge last year and its a great way for people to own up to their obsessive pinning and actually do one of the projects. This time they also included Cassie from Hi Sugarplum and Erin in from The Great Indoors.
I decided to knock out three things in one: Work on the bathroom, Organize a part of the house and Participate in the challenge. And all with a small, shallow linen closet!
Oh did I forget to mention that it is covered in grout dust! That goes to show you that just because there is a door, doesn't mean that they won't get grout on them.
Well this is our messy and disorganized closet. I knew I wanted a prettier system and a little more color. I looked to pinterest for some inspiration and I found some great closets.
I started this project by tackling the grout dust and the clutter. I removed everything from the closet and wiped it down.
Katie from the Bower Power and Sherry from Young House Love started doing the pinterest challenge last year and its a great way for people to own up to their obsessive pinning and actually do one of the projects. This time they also included Cassie from Hi Sugarplum and Erin in from The Great Indoors.
I decided to knock out three things in one: Work on the bathroom, Organize a part of the house and Participate in the challenge. And all with a small, shallow linen closet!
Oh did I forget to mention that it is covered in grout dust! That goes to show you that just because there is a door, doesn't mean that they won't get grout on them.
Well this is our messy and disorganized closet. I knew I wanted a prettier system and a little more color. I looked to pinterest for some inspiration and I found some great closets.
This closet from BHG.com has great color, organization and style.
This closet from beneathmyheart.net proved that a small space was no excuse!
Finally I loved the baskets in this closet at diydesignfanatic.blogspot.com.
I started this project by tackling the grout dust and the clutter. I removed everything from the closet and wiped it down.
This doesn't even include towels! It was good to go through and find expired medicines and whatnot but we also found some random treasures like this very outdated digital camera that is about 8 years old.
I also found a great pumice stone...granted it's shaped like a Christmas tree and has probably been in there longer than I care to admit but it's still in the packaging so don't judge me- I am going to use it now.
Finally I was left with a bare closet.
And a few coats later, using the paint from our downstairs bathroom, it was looking better already.
Next came the shelving. Since I was on a budget, we kept the same white shelves but I hit Walmart for some cheap affordable baskets to help organize everything and make room for some towels for the hubby and I.
A little organizing and a little rearranging later and Presto Chango, we have a more organized and prettier closet!
I still have to make some pretty labels but I loved how it came out. We have my hubby's stuff in the top basket. Then the middle basket are our health and wellness items (such as vitamins, medicines and first aid) and then the last basket is just for me! I haven't had a chance to really use it since our bathroom is still under construction but I may have been sitting on the floor admiring it last night.
Here is a little side by side action:
BEFORE AFTER
It feels so good to get this organizing project done! I feel better already and I can't wait to use the bathroom in all its beauty. Have you completed any projects lately? Did you rise to the Pinterest Challenge?
Also linked up to:
Also linked up to:
Labels:
Getting crafty over here,
Home Projects
February 16, 2012
Wrapped around my...umm... bottle?
Happy Friday Everyone! I am really excited to be heading to Drexel's AAGA Art Auction tonight. I will write about what I donated on Monday and I will make sure I post pics about some of the great art I see there. But until then I wanted to show you guys the other project I have been working on from my sneak peak the other day.
Well this project was another pinterest inspiration. After the holidays...well lets just say... I had a few extra wine bottles sitting around. I was thinking about what I can do with them. I love the shape of the bottle but I wasn't crazy about the color. So after searching the web I came up with these great inspiration ideas.
I loved the colors in this one. It would go with our house pretty well.
So I started collecting all the wine bottles, made sure they were clean and raided my mother in laws garage for some yarn and went to work. I used a hot glue gun since I didn't really have any other glue that I thought would work as well. Although it was hot at times, I think it worked.
I started from the bottom up. I wasn't worried about it looking perfect. Once it was done, it would blend in well and the dried glue would cover the wine bottle where the yarn didn't meet.
*Heads up* This project took me about a bottle every 2 hours so make sure you have either a great CD or a fun marathon to curl up on the couch with. I went with Scrubs...a classic.
In the end, I love how it came together.
Well this project was another pinterest inspiration. After the holidays...well lets just say... I had a few extra wine bottles sitting around. I was thinking about what I can do with them. I love the shape of the bottle but I wasn't crazy about the color. So after searching the web I came up with these great inspiration ideas.
| found here |
| from here |
I started from the bottom up. I wasn't worried about it looking perfect. Once it was done, it would blend in well and the dried glue would cover the wine bottle where the yarn didn't meet.
*Heads up* This project took me about a bottle every 2 hours so make sure you have either a great CD or a fun marathon to curl up on the couch with. I went with Scrubs...a classic.
In the end, I love how it came together.
Since I was so happy with this one, I decided to keep going. I had white and tan yarn so I decided to mix it up and create strips going up the bottle. It was a little more tedious to do since I had to switch yarns but I liked how it came out.
(Yes- I took this picture on the floor. In my defense I am trying to work on taking better pics with my point and shoot sony camera and this lighting seemed better.) Here is a pic of them together.
I love them. Now I just need to keep going and finish the rest of them. But that is for another day. I will probably do at least one all white and one all tan. Then maybe I will try another design. So what do you think? Do you have any fun projects that you accomplished with wine bottles?
Labels:
Getting crafty over here
February 14, 2012
I Cho Cho Choose You
Ah...Valentines Day! It brings out so many emotions for people. Some gushy, some romantic, some jaded and some angry. Even though I know it is a consumer driven holiday, I love Valentine's Day. Its a nice little break in the norm to enjoy those around you. That can be spouses, friends or family...or pets. *insert another cute pic of the pup*
The hubby and I have a tradition that is going strong from college. When we were freshmen in college he came down south to visit me for Valentines Day. We didn't make a reservation anywhere (rookie mistake) thinking we could just wing it. Well no luck. So we ended up ordering Chinese food and eating it on the floor of my dorm and we watched "10 Things I Hate About You". Moment of silence for Heath Ledger since he was one of my hubby's "man-crushes". (don't ask)
Any who, even though we don't always eat on the floor or watch the same movie, we usually get take out and chill in. So last night we did just that. We got Chinese food and ate it on our living room floor with a nice fire and we watched Justified (not the most romantic show but we are obsessed!). It was fun and relaxing.
But enough about our chill night. The more important question is: What did we get each other? Well we scaled back this year since we just went to Nashville and Christmas was a bigger venture. So I decided to make him his gift. I have been tagging these map ideas on pinterest and I loved the idea of doing something like that for us.
So first I decided what I wanted to highlight. The first time we met. The place we got engaged. Where we got married. And finally, our first home together. I google mapped them and then took a screen shot. I am sure there are easier ways to do this but this worked for me.
All in all it was a great relaxing night. What did you do for Valentine's Day? Did you just relax at home and just veg out? Or did you hit the town with friends or your significant other?
The hubby and I have a tradition that is going strong from college. When we were freshmen in college he came down south to visit me for Valentines Day. We didn't make a reservation anywhere (rookie mistake) thinking we could just wing it. Well no luck. So we ended up ordering Chinese food and eating it on the floor of my dorm and we watched "10 Things I Hate About You". Moment of silence for Heath Ledger since he was one of my hubby's "man-crushes". (don't ask)
Any who, even though we don't always eat on the floor or watch the same movie, we usually get take out and chill in. So last night we did just that. We got Chinese food and ate it on our living room floor with a nice fire and we watched Justified (not the most romantic show but we are obsessed!). It was fun and relaxing.
But enough about our chill night. The more important question is: What did we get each other? Well we scaled back this year since we just went to Nashville and Christmas was a bigger venture. So I decided to make him his gift. I have been tagging these map ideas on pinterest and I loved the idea of doing something like that for us.
Originally from Crafty DIY by Michelle Greene |
So first I decided what I wanted to highlight. The first time we met. The place we got engaged. Where we got married. And finally, our first home together. I google mapped them and then took a screen shot. I am sure there are easier ways to do this but this worked for me.
Then I drew a heart around them and made sure they were all the same size. I saved them in a PDF and printed them on card stock. My next step was cutting them out. I took my time and carefully tried to keep the red around the heart in tack. That was where the preview cut in.
Once I had them all cut out, I needed the right font. I choose Sofia font and typed up my sayings. I wanted them all to be connected so I started each one with Where:
Where we met, Where we got engaged, Where we tied the knot, and Where we made our home.
After that I just laid them out on a 11X14 frame, figured out what layout I wanted, taped them down (since i was out of glue) and viola.
I love it. It means a lot to both of us and the best part is that I made it for him so it makes it extra sappy. :)
As for me, Tim proved once again that he is really good at listening to me. Enter his gifts
A shoe rack! I have been using a broken small show rack as basically a place for me to pile my shoes on. It wasn't working and I was always frustrated. I'm so happy he got this for me. I am thinking maybe of painting it a fun color. Any thoughts? He also got me some great cooking things. I know these will definitely come in handy in the kitchen.
A Cupcake plunger so I can make cupcakes with filling! I can't wait to use it.
http://www.bedbathandbeyond.com/product.asp?SKU=17413783
And an awesome chopping board and scooper. I know I will probably use this this week.
http://www.bedbathandbeyond.com/product.asp?SKU=18591855
All in all it was a great relaxing night. What did you do for Valentine's Day? Did you just relax at home and just veg out? Or did you hit the town with friends or your significant other?
Subscribe to:
Posts (Atom)