 |
| This isn't actually a pic of our old car specifically, this is from the website. I felt compelled to stress that in case you couldn't tell from the awesome photo editing and the souped up ride :). However, 6 months in we hit Christmas time and realize that we both needed cars more and more. Tim wasn't traveling that much and needed to stop in at the office. I still had to take the car everyday to work (its about a 30-40 min. commute). So we searched for a used small SUV style car since we love our current Toyota Rav 4 so much. The hubby suggested a Hyundai Santa Fe. He has gotten it a lot as his rental car and he likes how it drives and the storage they provide in the back. So we searched...and test drove...and haggeled....and searched more but we still were not having any luck finding a well priced used car. So last week we got our answer when a Hyundai dealership about 50 minutes away was having a serious sale on new cars. In fact, the prices were competing with the used cars we were looking at. After a little Q & A with the lady at the dealership, we decided to check it out. So we headed down there this weekend and found this beauty.  Isn't it awesome? Neither Tim nor I have ever owned a brand new car and I'm not sure if we ever will again but right now we are really happy that we waited until we were sure we got what we wanted (and saved a nice chunk to put down). I know what you're thinking...what does James have to say about all this? Well he doesn't seem to mind all the room in the back.  *update: not even 24 hours of having the car and James scratched the drivers side door already! Silly pup got excited when we came back from a quick drive with Tim's mom and JUMPED on our car door. You could say, we were not excited. Lucky for him, we love him to death and some turtle wax helped buff it out.* If and probably when I have to go car shopping again, I really want to remember some of these helpful tips for next time. Some of these we did (go us!) and some of them we WISHED we did: (see if you can guess what we did/didn't do.) - Make sure you check with the dealership about what form of payment they take. (check, cashiers check, credit card etc.) - Try not to go on a Saturday. You aren't the only one thinking of buying a car that day and the line and wait will be ridiculous and a waste of time. - Don't always believe all the ads. Read all of the fine print and call and ask more information about it before going. - If you are looking at used cars, always turn the radio off at test drives and listen to the engine. Any little noise you hear could be something much bigger. (exp. We heard a little noise on a used one, had it checked out by a mechanic before buying and it turned out to be a $1,500 oil leak) - Check with your insurance company before looking at cars to see what you will need to do to add a car you bought to your insurance right away. So instead of any fun recipes or home projects, this was our big game changer this weekend. Any one else buy a car recently? Anymore tips to add? I am proud to say we did most of these things but after a little trial and error. :) |

January 29, 2012
My Car Goes Vroom
I am sooo excited to be writing this post. I don't think I ever mentioned it but for the last 7 months my husband and I have been a one car family. Long story short- my brother needed a car, we were thinking of selling our fun, little Mazda stick shift so in the end we sold him the car. Since Tim travels a lot for work and we are lucky enough to be walking distance from a train stop to the airport, it wasn't really a problem for a little while.
January 26, 2012
Hi! My Name is Lisa and I'm Addicted to Photos and Art
It's true. The minute you walk into our house you are surrounded by either art, photos or mirrors. I can't help it. I come from an art background and I have always loved being surrounded by photos and art that make me smile or remind me of a certain memory or time. So when we made our latest gallery wall in the guest room, it was no surprise that I would fill it with the things I love.

By what exactly did I hang in that wall?
Well the gallery wall started with this art canvas that my brother in law got us.

It's great because not only does it remind me of a great vacation we had in Munich but it also is a piece of art. The best of both worlds. Let's see what other pieces made it to the wall.

Above is a wonderful print I received for Christmas from the Artistic Rebuttal Project that I spoke about last year. I loved the quote, colors and look so I took an old broken frame that I got from the thrift store and added it to the wall.
For the next piece of art I used a Virginia map that I had from college. I went to VCU (GO RAMS!) so Richmond will always hold a special place in my heart. I cut out a small square and added it to a frame that I got on clearance on AC Moore awhile ago. Another easy example of free art!

But my gallery wall also need some great photos for our guests to oggle (is that how you spell that?)over so we added a great bridal party shot from our wedding and another moment from Oktoberfest with one of our closest friends to tie into our large focal piece.

Another piece of my art is actually a two parter. Tim and I got these pieces from the AAGA Annual Art Auction we go to every year. I loved the colors and how simple they are. This is the first piece. (I plan on painting some of these frames BTW)

The other half lives diagonally from it with another cluster of pieces.

I kept them separate so your mind would travel over the whole wall and connect them back to each other. In my mind it helped tie everything together. Finally I have a picture of my grandmother and I. She taught me everything I know about Italian cooking and I love her to pieces. I look up to her so much. The last picture to the right is a beautiful castle shot that I look in Bellinzona, Switzerland. It is right by the border of Italy so it has a large influence from there. It was one of my favorite places we traveled and it makes me smile when I look at it.
One of these days I will give a breakdown of the other pieces we hung up. The only thing I wanted to convey here is that in my mind, a gallery doesn't need to all be matchy matchy. I mean, don't get me wrong- it will look great if you decide to do that. I even did it with this collection of family wedding pictures.

The point is I don't really think there are any particular rules you have to follow. I would just go with what you think balances out and ties into each other and it will work.
So there is my two cents. Do you have any rules that you like to follow when it comes to hanging art or photos? Do you prefer matching frames or do you live to rebel?
January 24, 2012
Two Mass' and a Dream
Get it? Mass' = the huge steins of beer we are holding below. No? Too much? Well anyway, remember when we went to Germany in September for the Annual Oktoberfest Celebration in Munich, Germany? (when I fell off the face of the blog world)

Well my brother in law gave us an awesome gift from Christmas: A Bansky Graffiti Print of the awesome picture above. So when this came in the mail, I knew it had to go somewhere special in our house.
As for the dream? Well this wall represents it...well, at least the dream of what could be.
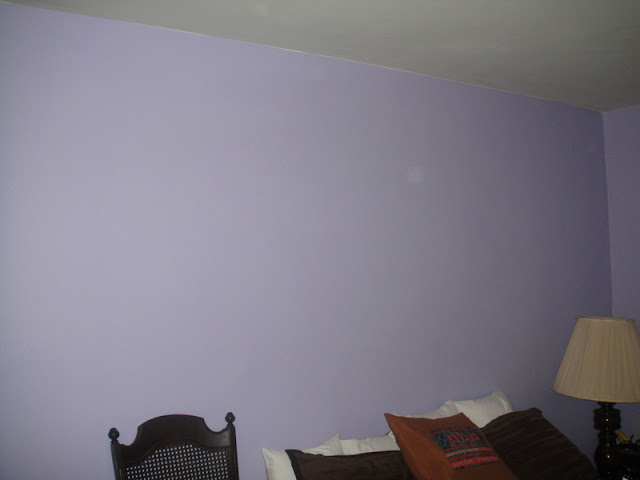
This huge, blank purple wall is in our guest bedroom. I haven't done much in there and there is still a lot of work to be done but I desperately wanted to hang some art on the walls so when guest came, they felt like they were staying in a semi completed room.
Whenever I want to create a gallery wall, whether it is up the stairs, or around a thermostat or on a giant blank wall like this, I always start on the floor. I like to lay out the pieces and move them around until I think they are balanced. So that's where I started.

I started collecting random art, pictures and objects around the house that I have been meaning to hang but had no place (or motivation) to hang them. This can sometimes take me awhile and messes usually occur anytime I do a project so while you see the prints on the floor, this was on the bed.

Some of the frames we had didn't have a hanging hook so we had to rig up our own devices.


Of course we had to take some breaks because someone wanted some love and of course we were happy to oblige.


I know, I know- Our lighting stinks! Its on the To Do List.
The wall is still a work in progress. I will add more as we go and I plan on spray painting those silver frames to bring them back to life. I will also end up painting that mirror but I'm not quite sure what color. Here is another angle.
On Friday I will break down where all the art came from but until then, what do you think? Do you like the randomness? Or is symmetrical more your style?
Does it help if I told you that I didn't spend a dime on this project? Because it sweetens the deal a little for me. :)
ps: Want to see more of my slight obsession with photos and art? Check out other parts of my home here.

Well my brother in law gave us an awesome gift from Christmas: A Bansky Graffiti Print of the awesome picture above. So when this came in the mail, I knew it had to go somewhere special in our house.
As for the dream? Well this wall represents it...well, at least the dream of what could be.

This huge, blank purple wall is in our guest bedroom. I haven't done much in there and there is still a lot of work to be done but I desperately wanted to hang some art on the walls so when guest came, they felt like they were staying in a semi completed room.
Whenever I want to create a gallery wall, whether it is up the stairs, or around a thermostat or on a giant blank wall like this, I always start on the floor. I like to lay out the pieces and move them around until I think they are balanced. So that's where I started.

I started collecting random art, pictures and objects around the house that I have been meaning to hang but had no place (or motivation) to hang them. This can sometimes take me awhile and messes usually occur anytime I do a project so while you see the prints on the floor, this was on the bed.

Some of the frames we had didn't have a hanging hook so we had to rig up our own devices.


Then we got to work hanging the pictures and turning this boring, purple wall into a gallery.


After some good belly rubs all around and some screws and wire later, we were left with this.

I know, I know- Our lighting stinks! Its on the To Do List.
The wall is still a work in progress. I will add more as we go and I plan on spray painting those silver frames to bring them back to life. I will also end up painting that mirror but I'm not quite sure what color. Here is another angle.
On Friday I will break down where all the art came from but until then, what do you think? Do you like the randomness? Or is symmetrical more your style?
Does it help if I told you that I didn't spend a dime on this project? Because it sweetens the deal a little for me. :)
ps: Want to see more of my slight obsession with photos and art? Check out other parts of my home here.
January 23, 2012
A handmade, built in media cabinet
Working with a 1,000 square foot house presents certain challenges. Especially when you have a small living space. So when we moved into our house we knew three things:
1) Tim knew the minute he saw the fireplace that he wanted to install a TV above it.
2) That we had nowhere to put the cable box or play station box. (The mantel was too narrow)
3) That we scheduled a huge house warming party 2 months after moving in. (What was I thinking?)
*Unfortunately I don't have any pictures of its construction but I wanted to write about it since it was our first project in the house and we love it.*
In comes my awesome father in law. He knew that we had space that we could cut into underneath our staircase. So after Tim and him figured out how to run the wires for the TV up through the ceiling and over to the staircase, we figured out how and where to cut into the wall. He built the shelving system on an angle to compliment the staircase and the studs. Then we put a door on the bottom shelves so we could hide the DVDs and other storage. We painted it the same colors as the trim and BAM-we had a built in. Here it is in all its glory.

Whats the best part? We only spent around $75.00 on the project- for the frames and shelving. Here's a wider shot so you can tell exactly where it is.

It is completely out of the way so it doesn't take up any of our coveted floor space and it also keeps all the media organized and accessible. Here is an inside shot of the built in cabinet.

This holds all of our DVDs and other random media equipment. I wish this was a more organized shot but we can just label it a "keeping it real" photo. As for the TV, well it is hanging proudly above the fireplace. (yes- thats The Biggest Loser. I love that show!)

You can't tell from this picture but there are two wire hiders hanging from the ceiling. Barely noticeable. I was so proud that we were able to all pull this off...especially before the party.
Do you have any projects that you are proud of? Any that feel like they should have been there all along?
1) Tim knew the minute he saw the fireplace that he wanted to install a TV above it.
 |
| Our house before moving in |
2) That we had nowhere to put the cable box or play station box. (The mantel was too narrow)
3) That we scheduled a huge house warming party 2 months after moving in. (What was I thinking?)
*Unfortunately I don't have any pictures of its construction but I wanted to write about it since it was our first project in the house and we love it.*
In comes my awesome father in law. He knew that we had space that we could cut into underneath our staircase. So after Tim and him figured out how to run the wires for the TV up through the ceiling and over to the staircase, we figured out how and where to cut into the wall. He built the shelving system on an angle to compliment the staircase and the studs. Then we put a door on the bottom shelves so we could hide the DVDs and other storage. We painted it the same colors as the trim and BAM-we had a built in. Here it is in all its glory.

Whats the best part? We only spent around $75.00 on the project- for the frames and shelving. Here's a wider shot so you can tell exactly where it is.

It is completely out of the way so it doesn't take up any of our coveted floor space and it also keeps all the media organized and accessible. Here is an inside shot of the built in cabinet.

This holds all of our DVDs and other random media equipment. I wish this was a more organized shot but we can just label it a "keeping it real" photo. As for the TV, well it is hanging proudly above the fireplace. (yes- thats The Biggest Loser. I love that show!)

You can't tell from this picture but there are two wire hiders hanging from the ceiling. Barely noticeable. I was so proud that we were able to all pull this off...especially before the party.
Do you have any projects that you are proud of? Any that feel like they should have been there all along?
January 20, 2012
I may not be a baker, but my friend is!
We all know by now that I am trying to teach myself how to bake. I am slowly getting there but it is an uphill battle. Luckily I have an awesome friend that is a wonderful baker.

Jonelle has been giving me baking tips and inspiration over the years and I asked her to write a guest blog post on a new dessert she tried out and it looks and sounds delicious! Not only did she give me a recipe and pictures but she also put in some tips along the way. Hope you all try it out. I know I am going to.
This was a first time recipe for me - something new i wanted to try and figured this would be a good time to try it. I think I pinned this on Pinterest back when I was preggo and was obsessed with smores. It was definitely worth while - we have been enjoying them!
S'mores Cookies Recipe
Ingredients you will need:
11 Tablespoons unsalted butter, softened
1 cup brown sugar, packed
½ cup granulated sugar
2 large eggs
1 teaspoon vanilla
1 teaspoon baking soda
½ teaspoon sea salt
1 teaspoon cinnamon
2 ½ cups flour
1/2 cup semi-sweet chocolate chips (I used a little more than this)
1 cup mini marshmallows
2-3 regular sized Hershey’s bars, broken into pieces (depends on how many graham crackers you use)
2-3 sleeves graham crackers, broken into squares

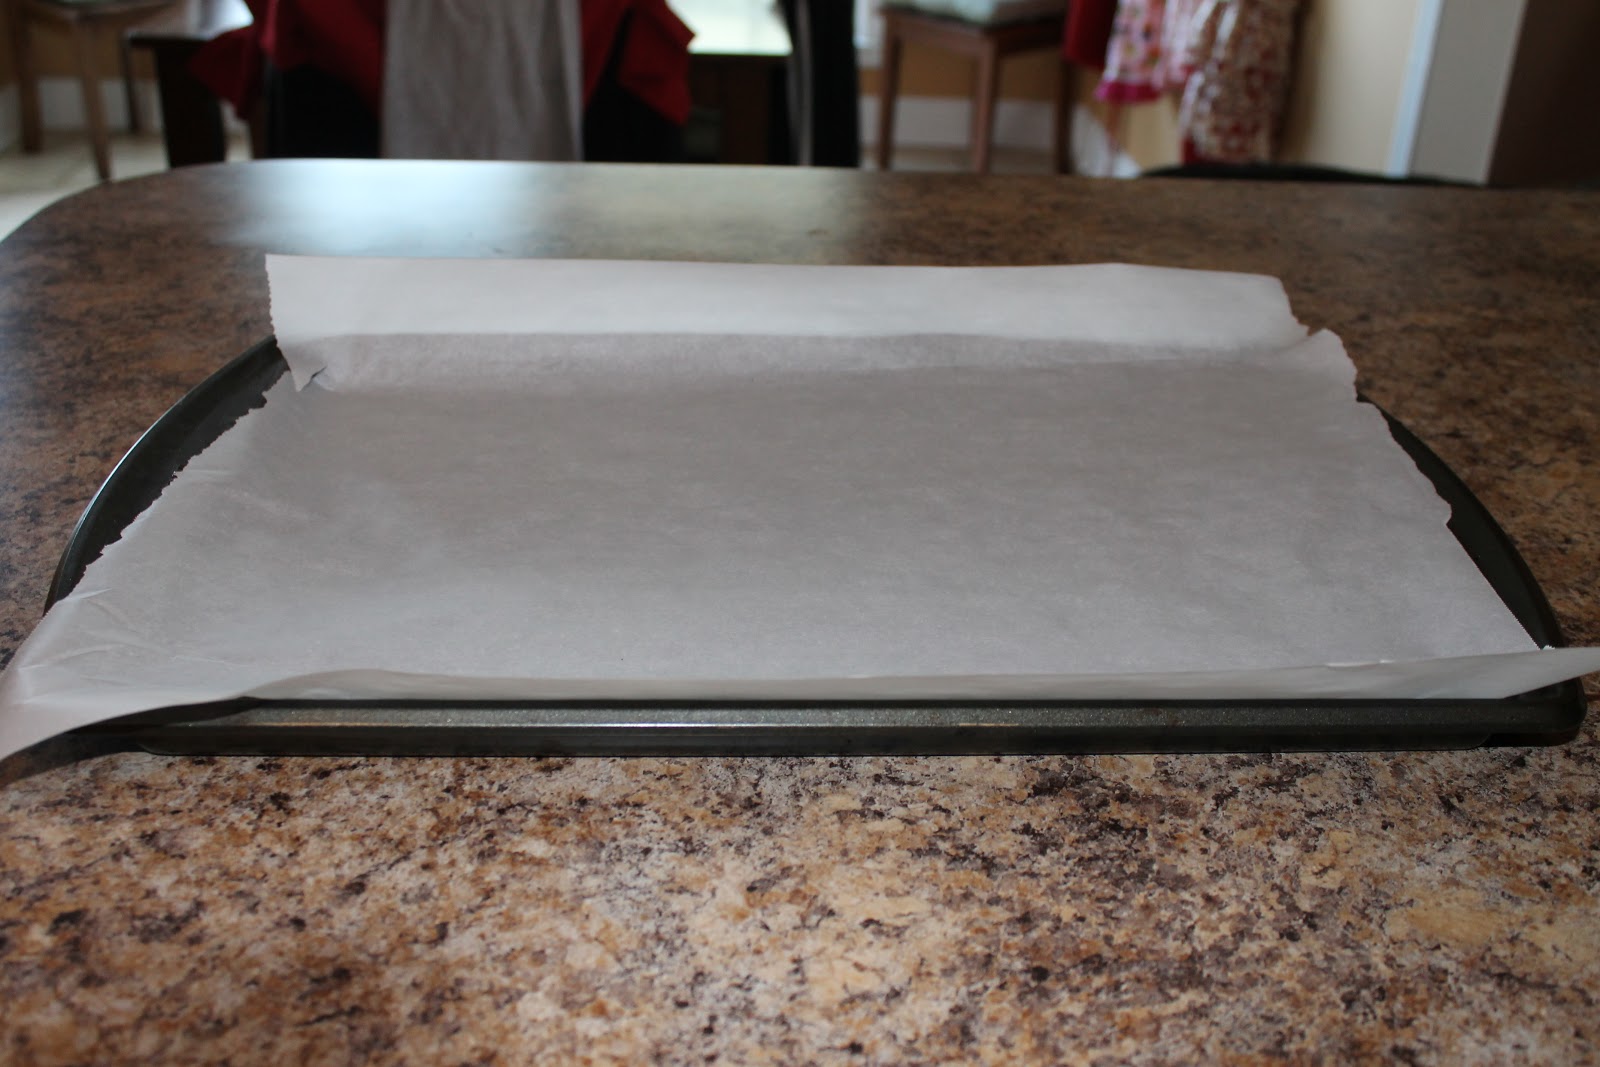
Preheat the oven to 375 degrees. Line baking sheet(s) with parchment paper. I used one 11x17 pan but you can really use any sized pans you want – it all depends on how many graham crackers you use.

Lay out graham crackers side by side on the pans as close as possible (they should be touching). I ended up with 28 graham cracker squares – they all fit on one baking sheet. You may have to add or remove graham crackers according to how much dough you have. If you want your cookies thicker you will use more dough and less graham crackers. My cookies ended up being on the thicker side (which was totally fine by me).

In a medium bowl, whisk together the flour, baking soda, sea salt and cinnamon to combine. Set aside.
(Side Note: When I make these cookies again, I will most likely omit the cinnamon. I just wasn’t my preference. You can make it once with the cinnamon and make your own decision about it)

Baking Tip: When I am baking and measuring flour, I always measure it out the same way. I always scoop out the flour into a measuring cup and tap it a little with a butter knife – that way the flour really fills out the entire cup. Then I sweep away the excess flour with the back of a butter knife to get a nice, even and accurate flour measurement.

In the bowl of an electric mixer, cream butter with white and brown sugar until light and fluffy.

Add the eggs and vanilla and mix until combined.


Add the flour mixture to the butter mixer and combine on low speed so flour doesn’t go flying all over your kitchen.

Fold in the chocolate chips and marshmallows. Chill dough in refrigerator for about one hour to set.


Place heaping tablespoons of dough on graham crackers about 1 – 1 ½ inches apart. I averaged about 1 1/2 tablespoons of dough per graham cracker square as seen in the picture below.


Press down slightly with fingertips.
 Bake for 5 minutes then remove from oven to press Hershey’s bar pieces on to the top. You can place as many pieces or as little as you want, depending how much chocolate flavor you want. I just used one Hershey bar piece per cookie and found that it was plenty. Feel free to use as many as you want! Please ignore my slight OCD when it came to arranging the Hershey’s bars on my cookies.

Bake for 5-7 more minutes, or until the dough begins to turn golden brown at the edges. If you made thicker cookies, you will need to keep them in the oven a little longer. I ended up keeping mine in there about 8-9 minutes after I put the Hershey’s bars on.

Remove to a wire rack to cool. For clean cutting make sure cookies are completely cool and cut with a sharp knife. I personally didn’t cut mine with a knife – I just broke apart the pieces for a rougher look. Enjoy!!

Wow! I think I would be willing to run an extra mile or two to enjoy these bad boys. They look so good. Thanks for the awesome recipe breakdown and tips Jonelle!!
Jonelle has been giving me baking tips and inspiration over the years and I asked her to write a guest blog post on a new dessert she tried out and it looks and sounds delicious! Not only did she give me a recipe and pictures but she also put in some tips along the way. Hope you all try it out. I know I am going to.
This was a first time recipe for me - something new i wanted to try and figured this would be a good time to try it. I think I pinned this on Pinterest back when I was preggo and was obsessed with smores. It was definitely worth while - we have been enjoying them!
S'mores Cookies Recipe
Ingredients you will need:
11 Tablespoons unsalted butter, softened
1 cup brown sugar, packed
½ cup granulated sugar
2 large eggs
1 teaspoon vanilla
1 teaspoon baking soda
½ teaspoon sea salt
1 teaspoon cinnamon
2 ½ cups flour
1/2 cup semi-sweet chocolate chips (I used a little more than this)
1 cup mini marshmallows
2-3 regular sized Hershey’s bars, broken into pieces (depends on how many graham crackers you use)
2-3 sleeves graham crackers, broken into squares

Preheat the oven to 375 degrees. Line baking sheet(s) with parchment paper. I used one 11x17 pan but you can really use any sized pans you want – it all depends on how many graham crackers you use.
Lay out graham crackers side by side on the pans as close as possible (they should be touching). I ended up with 28 graham cracker squares – they all fit on one baking sheet. You may have to add or remove graham crackers according to how much dough you have. If you want your cookies thicker you will use more dough and less graham crackers. My cookies ended up being on the thicker side (which was totally fine by me).

In a medium bowl, whisk together the flour, baking soda, sea salt and cinnamon to combine. Set aside.
(Side Note: When I make these cookies again, I will most likely omit the cinnamon. I just wasn’t my preference. You can make it once with the cinnamon and make your own decision about it)

Baking Tip: When I am baking and measuring flour, I always measure it out the same way. I always scoop out the flour into a measuring cup and tap it a little with a butter knife – that way the flour really fills out the entire cup. Then I sweep away the excess flour with the back of a butter knife to get a nice, even and accurate flour measurement.

In the bowl of an electric mixer, cream butter with white and brown sugar until light and fluffy.

Add the eggs and vanilla and mix until combined.


Add the flour mixture to the butter mixer and combine on low speed so flour doesn’t go flying all over your kitchen.

Fold in the chocolate chips and marshmallows. Chill dough in refrigerator for about one hour to set.


Place heaping tablespoons of dough on graham crackers about 1 – 1 ½ inches apart. I averaged about 1 1/2 tablespoons of dough per graham cracker square as seen in the picture below.


Press down slightly with fingertips.


Bake for 5-7 more minutes, or until the dough begins to turn golden brown at the edges. If you made thicker cookies, you will need to keep them in the oven a little longer. I ended up keeping mine in there about 8-9 minutes after I put the Hershey’s bars on.

Remove to a wire rack to cool. For clean cutting make sure cookies are completely cool and cut with a sharp knife. I personally didn’t cut mine with a knife – I just broke apart the pieces for a rougher look. Enjoy!!

Wow! I think I would be willing to run an extra mile or two to enjoy these bad boys. They look so good. Thanks for the awesome recipe breakdown and tips Jonelle!!
January 17, 2012
Commitment
Layla over at The Lettered Cottage gave everyone a word challenge for the year. Figure out what word you will use as inspiration or motivation for the year. I wasn't sure I could come up with a single word that I would find relevant for me but then I look back at some of my new years resolutions in this earlier post and this word jumped out: Commitment.

Its pretty self explanatory. This year I want to make sure that I commit to the things that I set my mind to.
1) staying healthy!- We all know that working out and eating healthy is important but it is not always easy. I have started getting back into eating healthy but working out is moving a little slower. I need to commit to making a conscious effort of eating healthy and if I can't go to the gym, I should at least be doing some sort of workout like a hike or something. It will be good to get in a routine now before Tim and I decide to start a family. That way we can all be one healthy family. :)

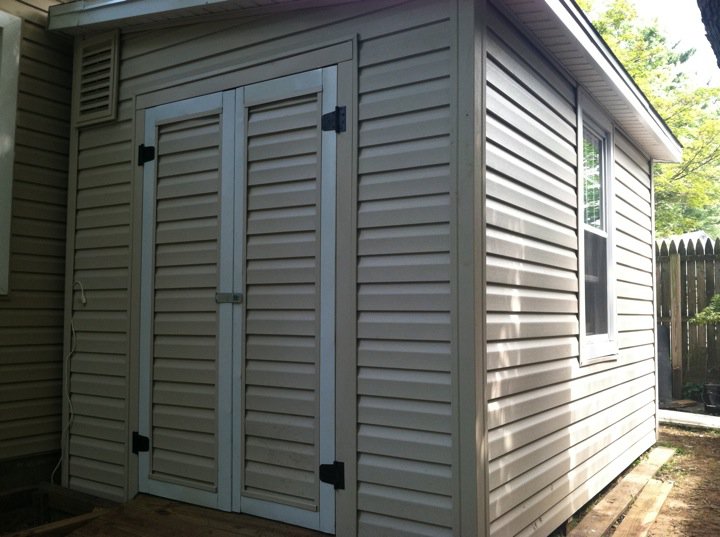
2) Getting Projects done: Tim and I have lived in our house for over a year and a half. Don't get me wrong, we have done some great things to our house like building a shed, installing a TV above the fireplace and putting in insulation.

I am glad we were able to tackle all of that but there are other projects that we have been talking about since we moved in and we are just stalling. We really want hardwood floors. The carpet in the house is old, used and hard to maintain with our dog. Also there is a room that we haven't even touched yet. It is small but it has access to the deck so besides being a dog room, we are thinking of a library/family room space. I am so excited. This is something that I haven't changed my mind about since I moved in. To give you some idea of what I mean, here are some inspiration photos (from pinterest).

I love the bench underneath the windows and the bookshelves on either side. Or this...

I love the idea of small french doors and the bead board behind the shelves. I know we will slowly make these projects happen but I want to Commit myself to making it happen.
3) The blog- I think I am already making a strong effort in keeping this blog going. I loved that my hubby supports having these memories of our first house and the early years of our marriage. We are very fortunate to have what we have and I think its great to track everything we have been able to accomplish (or at least try to). Committing to this will not be easy all the time but it will be worth it.
4) My marriage- Of course this is really important to me. Tim is my best friend. I have a strong commitment to him already but it is always important to work on it. Tim travels for his job. He is gone a lot. So that is never easy and I am really proud of how we are making an effort to make time for just the two of us when he is home. I am going to commit to enjoying all the time we have together (even if we butt heads!). And I am excited for all the fun we are going to have in the future.

Wow- that kinda felt like a therapy session. haha I'm glad that I wrote it all out so I was accounted for it. And I am really excited for this year to see what we do. If you could think of a word for the year, what would you choose? It wasn't really easy to come up with but I think its going to be great.
Its pretty self explanatory. This year I want to make sure that I commit to the things that I set my mind to.
1) staying healthy!- We all know that working out and eating healthy is important but it is not always easy. I have started getting back into eating healthy but working out is moving a little slower. I need to commit to making a conscious effort of eating healthy and if I can't go to the gym, I should at least be doing some sort of workout like a hike or something. It will be good to get in a routine now before Tim and I decide to start a family. That way we can all be one healthy family. :)

2) Getting Projects done: Tim and I have lived in our house for over a year and a half. Don't get me wrong, we have done some great things to our house like building a shed, installing a TV above the fireplace and putting in insulation.
I am glad we were able to tackle all of that but there are other projects that we have been talking about since we moved in and we are just stalling. We really want hardwood floors. The carpet in the house is old, used and hard to maintain with our dog. Also there is a room that we haven't even touched yet. It is small but it has access to the deck so besides being a dog room, we are thinking of a library/family room space. I am so excited. This is something that I haven't changed my mind about since I moved in. To give you some idea of what I mean, here are some inspiration photos (from pinterest).
I love the bench underneath the windows and the bookshelves on either side. Or this...
I love the idea of small french doors and the bead board behind the shelves. I know we will slowly make these projects happen but I want to Commit myself to making it happen.
3) The blog- I think I am already making a strong effort in keeping this blog going. I loved that my hubby supports having these memories of our first house and the early years of our marriage. We are very fortunate to have what we have and I think its great to track everything we have been able to accomplish (or at least try to). Committing to this will not be easy all the time but it will be worth it.
4) My marriage- Of course this is really important to me. Tim is my best friend. I have a strong commitment to him already but it is always important to work on it. Tim travels for his job. He is gone a lot. So that is never easy and I am really proud of how we are making an effort to make time for just the two of us when he is home. I am going to commit to enjoying all the time we have together (even if we butt heads!). And I am excited for all the fun we are going to have in the future.

Wow- that kinda felt like a therapy session. haha I'm glad that I wrote it all out so I was accounted for it. And I am really excited for this year to see what we do. If you could think of a word for the year, what would you choose? It wasn't really easy to come up with but I think its going to be great.
Subscribe to:
Posts (Atom)